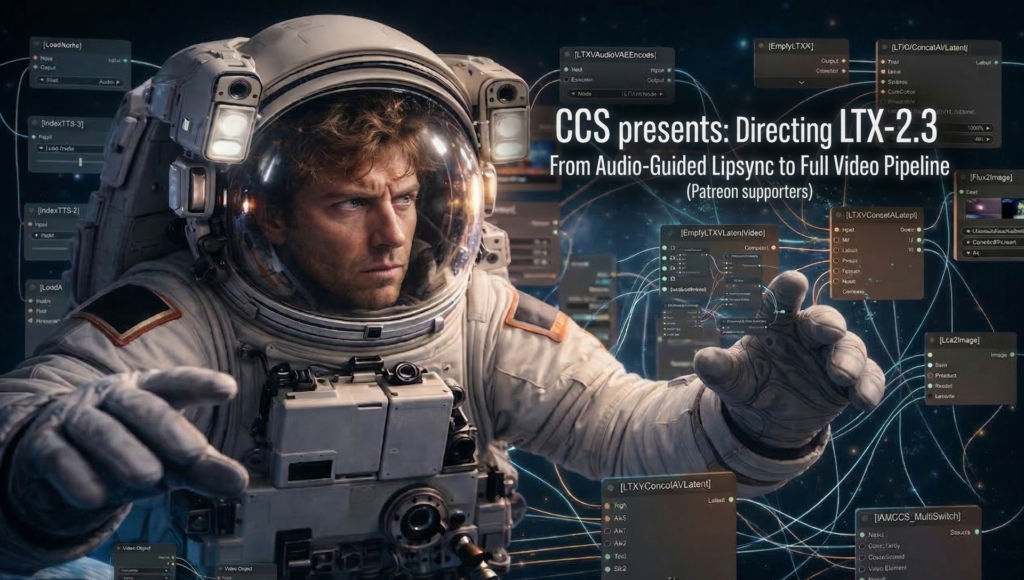
Hi folks, this is CCS — and as my elven friend Velgen Delois III already told you, Wanimate V2 is finally here — a real leap in motion realism and expressive depth. Let’s dive in.
The motion feels way more natural, facial expressions finally sync with emotional tone, and the overall video flow is tighter and more coherent than before.
The model now keeps its cool even in complex, multi-layered scenes — moving cameras, dynamic lighting, fabric folds, hair motion — without getting distracted by background clutter or random objects in the reference video. It’s like it finally understands what belongs to the subject and what doesn’t.
With WAN 2.2 Animate V2, you’re not just updating your model — you’re stepping into a new level of AI-driven cinematography. It’s faster, more expressive, and, most importantly, it finally feels alive.
I can already see all its benefits in my workflows, integrating it into the path of my artistic creation.
I’ll make a dedicated post soon to show you some of the AI seeds I use in my analog-digital cinematic process — because remember: these are just tools to expand our vision!
P.S. By popular request, I’ve added a second workflow for low VRAM users — instructions are at the end of the post!
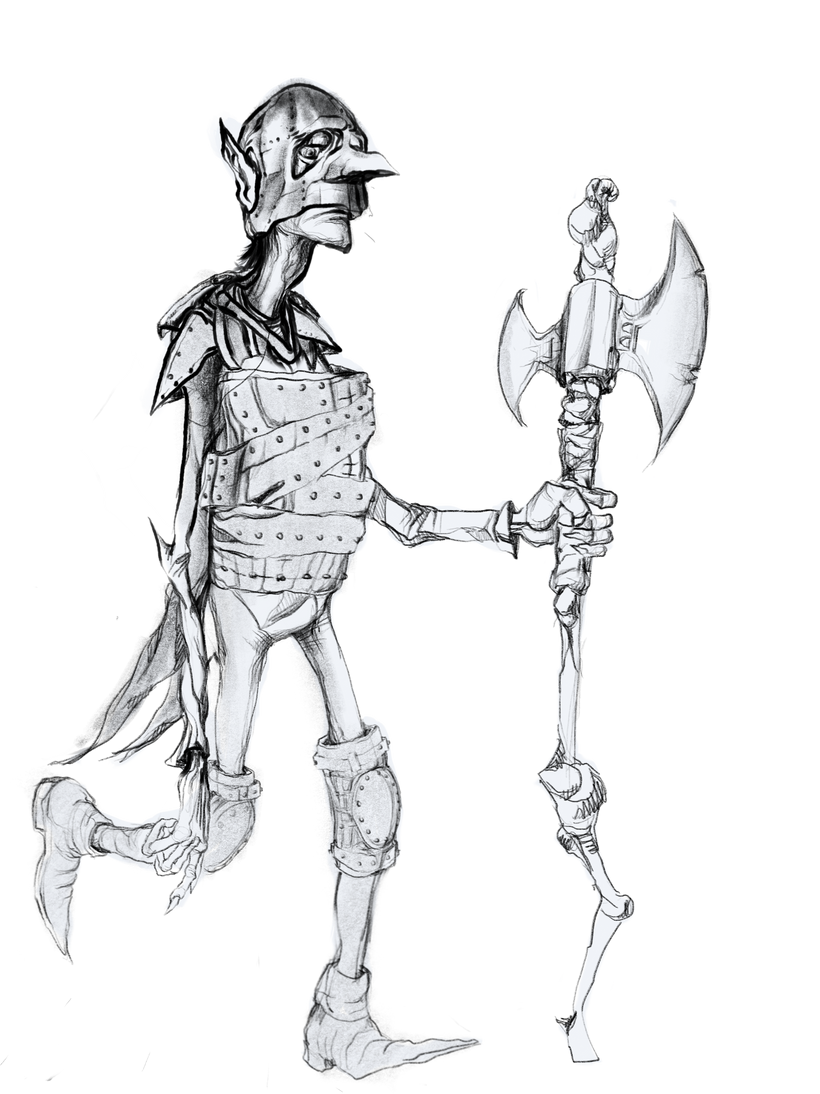
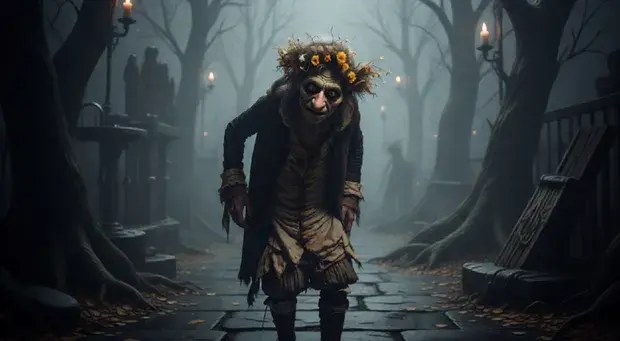 Extract from my dark-fantasy project “Edgar Letfall” — www.mitologiaelfica.comAll my characters are hand-drawn 🙂
Here’s the structure of the post:
-
RESOURCES
-
INSTALLATION PROCESS
-
DUAL-MODE WORKFLOW OVERVIEW
-
SOME FINAL CONSIDERATIONS
RESOURCES
First of all, here the links to the models:
Wan 2.2 Animate – Updated
https://github.com/kijai/ComfyUI-WanVideoWrapper
Model links:
https://huggingface.co/Kijai/WanVideo_comfy_fp8_scaled/tree/main/Wan22Animate
direct link to the new model: Wan2_2-Animate-14B_fp8_scaled_e4m3fn_KJ_v2.safetensors
LoRA:
https://huggingface.co/Kijai/WanVideo_comfy/tree/main/Lightx2v
https://huggingface.co/Kijai/WanVideo_comfy/tree/main/LoRAs/Wan22_relight
Text encoder:
https://huggingface.co/Kijai/WanVideo_comfy/blob/main/umt5-xxl-enc-bf16.safetensors
VAE:
https://huggingface.co/Kijai/WanVideo_comfy/blob/main/Wan2_1_VAE_bf16.safetensors
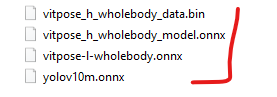
Onnx Models:
https://huggingface.co/Kijai/vitpose_comfy
Large:
https://huggingface.co/JunkyByte/easy_ViTPose/blob/main/onnx/wholebody/vitpose-l-wholebody.onnx
HUGE (need both files)
https://huggingface.co/Kijai/vitpose_comfy/blob/main/onnx/vitpose_h_wholebody_model.onnx
https://huggingface.co/Kijai/vitpose_comfy/blob/main/onnx/vitpose_h_wholebody_data.bin
INSTALLATION PROCESS
After downloading Wanimate V2, place it inside the diffusion_models folder within your ComfyUI/models directory.
Next, you’ll need to install the ONNX model.
⚠️ Pay attention to this step:
Create a new folder inside your ComfyUI models directory and name it “Detection”.
Place the new ONNX models inside that folder.

In that folder You’ll put the new onnx models
COMFYUI-WANANIMATE PREPROCESS
Now open ComfyUI Manager and install the new Wanimate Preprocess — it’s another essential part of the update.
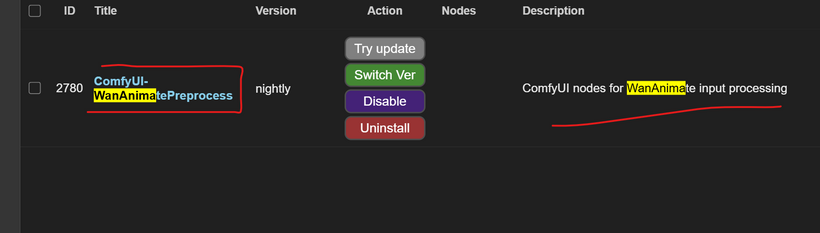
In fact, this update isn’t only about the WANVIDEO_COMFY_FP8_SCALED model.
It also includes the new preprocessing nodes, which improve the animation consistency and accuracy.
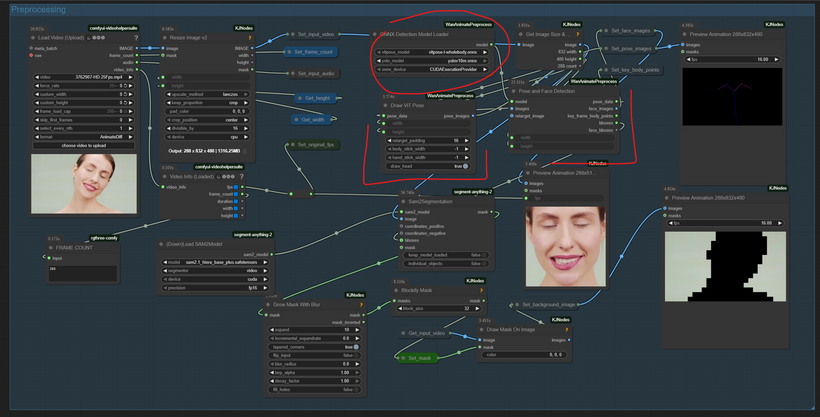
You can find the new workflow example inside the Workflow Examples section in ComfyUI new node to test everything out.
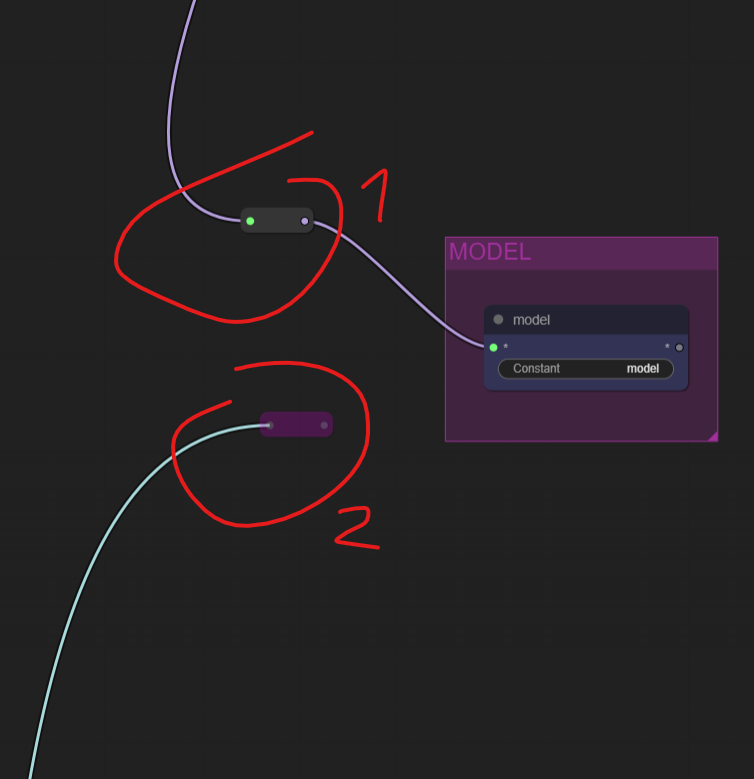
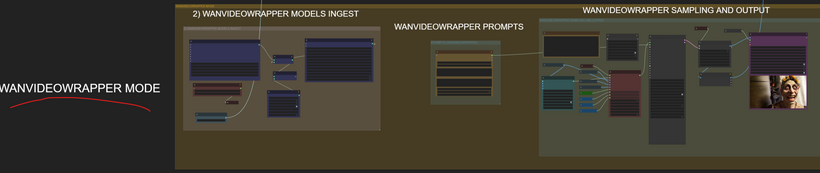
Dual-Mode Workflow Overview
I’ve prepared a new workflow that includes both methods — the WANVideoWrapper method and the native one.
In both cases, the preprocessing nodes and the new V2 model work perfectly.
Let’s take a look at the dual-mode workflow.
take a look to the general workflow
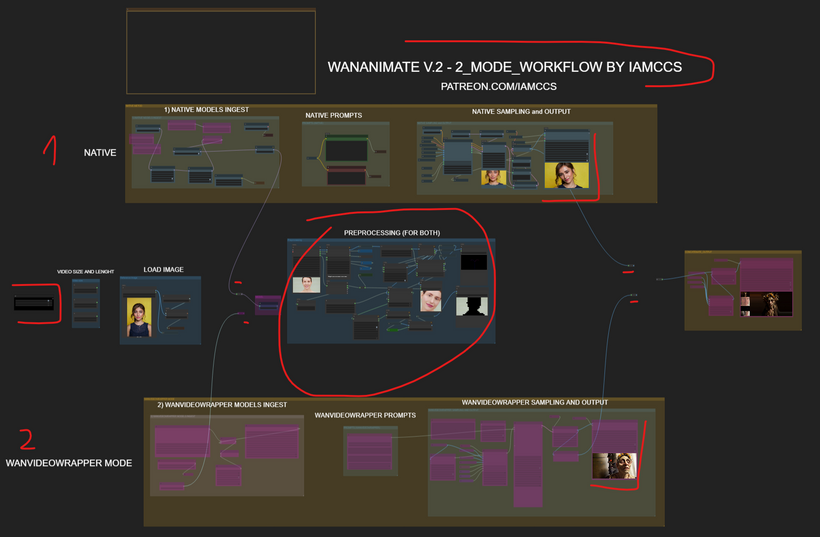
Below is the native method section, and above it you’ll find the WANVideoWrapper setup.
The central part of the graph is shared by both.
You can easily switch between modes using the bypasser node.
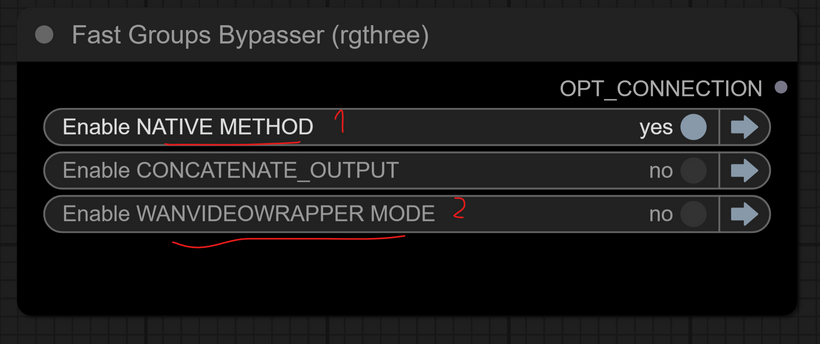
You can also choose to enable concatenated output, depending on your workflow.
Setup
Once you’ve chosen your Wanimate method, you just need to connect the links:
-
Upload your input image.
-
Set width, height, and video length.
-
Insert the reference video according to those dimensions.
-
And from there, the process begins…
The native method:

The wanvideowrapper mode:
Below, I’ve attached not only the workflow file, but also the testing materials — including the free-licensed video from Pexels so you can replicate the setup yourself.
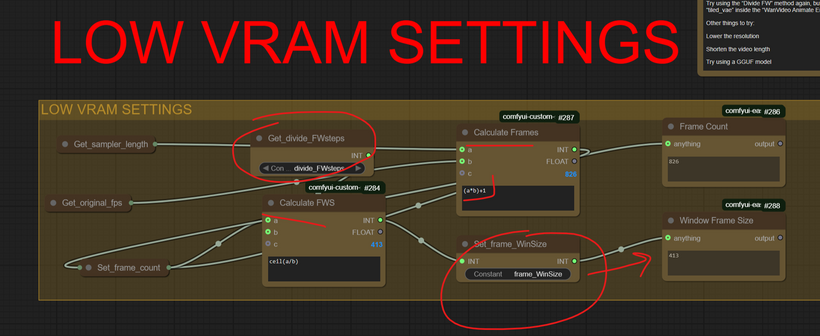
UPDATE for low vram users
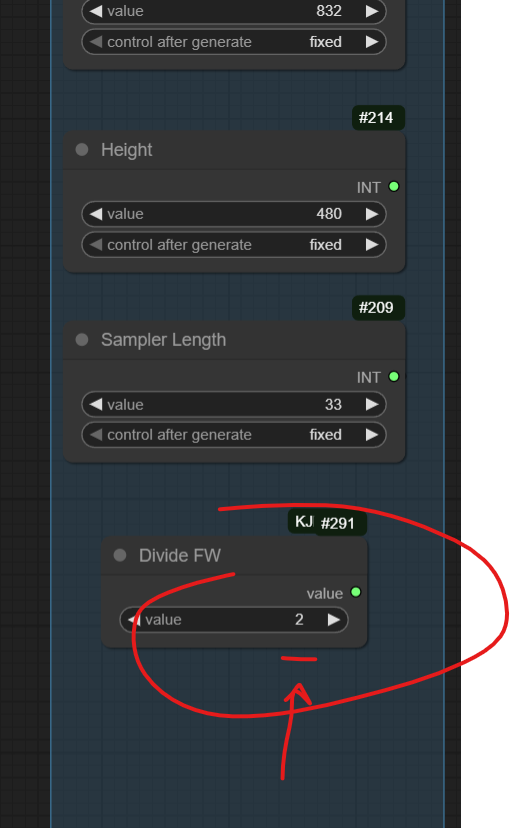
If you experience an OOM error, your VRAM Your PC probably can’t handle the original number of frames and resolution all at once.
This mode is for WANVIDEOWRAPPER mode only. Of course, with this method the video length isn’t unlimited — it depends on the length you set.
First of all check your paging fyle system (30gb or more are requested).
The next step (that might fix it) is to increase the value in “Divide FW” by 1 until it fits into your available VRAM.
Still not working?
——————————————–
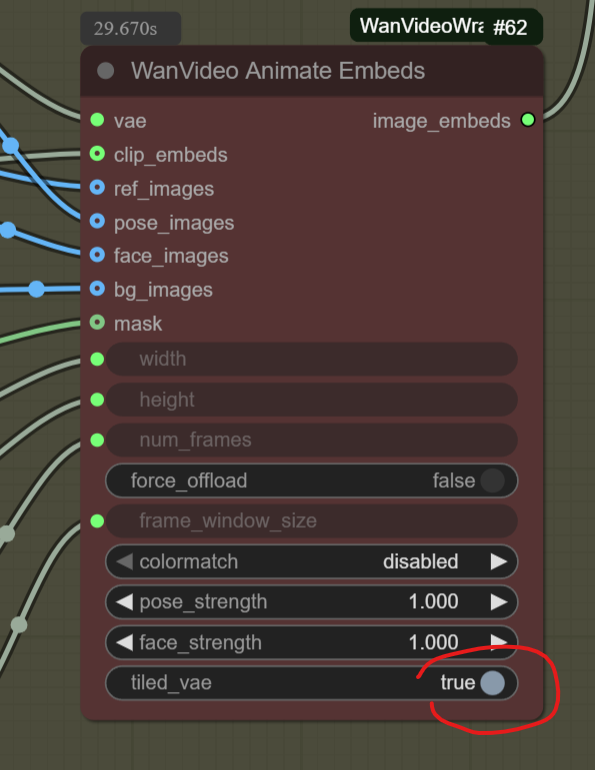
Try using the “Divide FW” method again, but this time enable “tiled_vae” inside the “WanVideo Animate Embeds” node.
Change the GPU mode to CPU in the wan text encoder and mark as TRUE the “use_disk_cache”
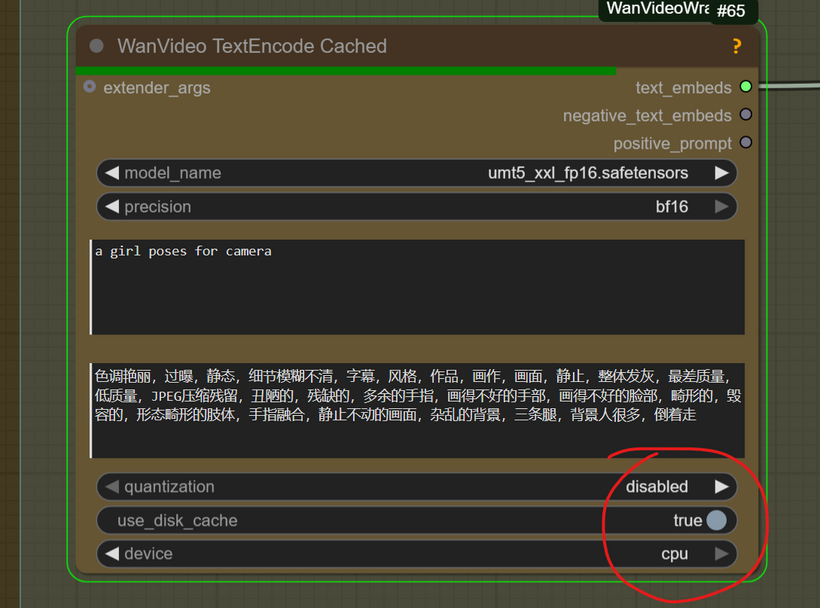
The “dividing FWS” math are the core of this method:
Other things to try:
Lower the resolution
Shorten the video length
Try using a GGUF model
If nothing changes, you probably need a fresh ComfyUI installation, since dependency conflicts are often the first cause of issues with newer nodes.
SOME FINAL CONSIDERATIONS
As you can see, we don’t need the awful point editor anymore — the preprocess section now detects everything automatically.
The second version of Wananimate achieves a much better overall motion and finer details.
There’s also the addition of a WanVideo Enhance A Video, which increases the resolution and definition of the final footage.
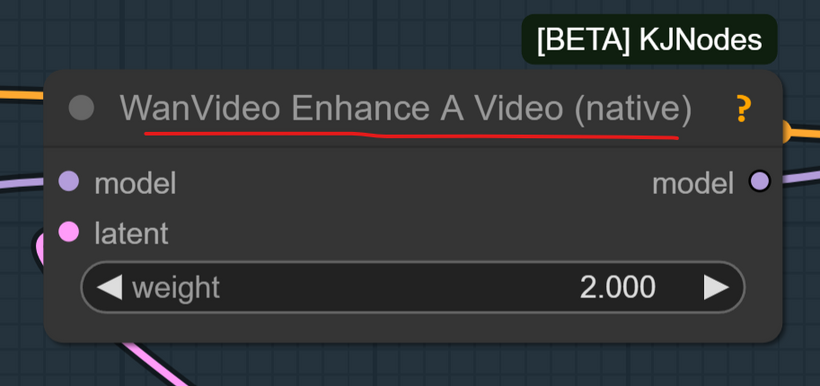
This node can also be used to improve the look of already generated videos, giving them a sharper and more cinematic appearance.
I’ll share a v2v workflow using it in an upcoming post.
The WanVideoWrapper method lets you generate without time limits: when your footage is longer than the frame window size, the node automatically adjusts and continues accordingly.
That’s not the case for the Native method, but we can overcome this limitation with a loop function — which I’ll include in an upcoming post.
Cinematic visions can now be shaped, extended, and hybridized — as mine are — across AI, Unreal, Blender, and the hand-drawn stages that always come first.
Because before any algorithm, before any line of code, there’s a human line — the pencil, the gesture, the intuition.
 One of the hand-drawn characters from my “Mitologia Elfica” project — an illustrated book series I’m transforming into cinematic reality.
My projects always start from sketches, storyboards, and scripts drawn and written entirely by hand. I never use AI for music or narrative composition — it would be terrible to let a machine replace what only a human mind can truly create.
Technology is a companion, not a creator.
The creative brain must — and will always — be ours.
I repeat this like a scripture.
Digital is only a tool, a bridge to make our inner visions visible.
More soon.
Hope you’ll have fun testing this workflow — I finished it at light speed just to let you experiment as soon as possible.
See you in the next post, and don’t forget to follow and support the project if you enjoy what I do!